Multiple ACT LABS Light Guns for MAME 0.117u and later using Windows XP
Much of this tutorial has
been pulled from Derrick Renaud’s page on Multiple Lightgun Setups:
http://derrick.mameworld.info/lightgun/Act_Labs_Light_Guns_on_XP.html
The instructions posted
there date back to version MAME 0.104u6.
As of version 0.117u, MAME moved many configuration settings to the core
mame.ini file, making Derrick’s directions still relevant but needing some
crucial updates. Updates to Derrick’s instructions, including the following
Addendum, appear here in blue, and have been
written by Scott Miller, scottmiller@sc.rr.com for ACT Labs http://www.act-labs.com/. At the time of this update, MAME was
operating with version 0.125u, June 3rd, 2008.
Derrick Renaud’s
Tutorial:
As of version 0.104u6, MAME
contains code that allows you to use multiple light guns in MAME. You can
use more then 2 light guns, as long as the total number of mice plus light guns
does not exceed 8. This functionality only applies when running this MAME
on Windows XP. Older versions of Windows use the regular functionality as
described in the documentation supplied with the guns.
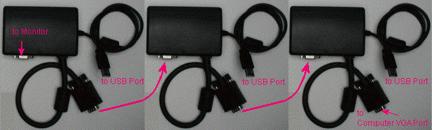
Hooking up the light guns
is the same as in the documentation. Except that you can use more then 2
devices. Any combination of 1-Player and 2-Player guns can be used.
They will each be recognized individually. The following picture
shows how to connect 3 light guns together.
If you have the 2-Player
light gun, you can leave the mode switch on position 1 for normal
shooting. You can then use position 2 to change the 2 buttons from
buttons 1 & 2, to buttons 3 & 4. Giving you the ability to
control extra functions. When in position 2, the trigger button is
now button 3 and it also updates the cursor position when pressed. This
allows you to map button 3 as a grenade button for games that use it. So
with a 2-Player gun you can set the mode switch to position 1 for regular
shooting. Then flip it up to position 2 with your thumb, and fire off a
couple grenades. Then flip the switch back to position 1 and continue
shooting.
In MAME, you no longer need
to use the -lightgun or -dual_lightgun commands. But you must use the -mouse command, and the -multimouse
command.
If you are running a game
that needs you to shoot off screen, you will still need to use the -offscreen_reload command. This will change the functionality of
button 2 to simulate firing off screen, thereby reloading.
For recent versions of
MAME, mice and light guns are considered the same. The test setup I used
had 3 mice and 2 light guns. The mice are Mouse 1, 2 & 3. The
light guns are Lightgun 4 & 5. This does not mean that you have 4 or
5 light guns. This is just the mouse position windows assigns them.
With light guns, only the X,Y axis data is different then the mouse data,
so you will see the buttons reported as mouse 4 & 5 and the X,Y axis are reported
as Lightgun 4 & 5. Your mouse and light gun numbers may be different
then the numbers show here.
To use light guns in this
version of MAME you would use a command similar to this:
mame yourgame -mouse -multimouse -r 800x600 -refresh 60
yourgame = is the name of
the romset you are using
-r 800x600 -refresh 60 =
sets the game to use a fixed resolution and refresh. This is so you do
not have to constantly re-calibrate your gun.
When you are in the game,
you will need to select the light gun as a control. Do this by pressing
the [TAB] key. You will now see this menu.
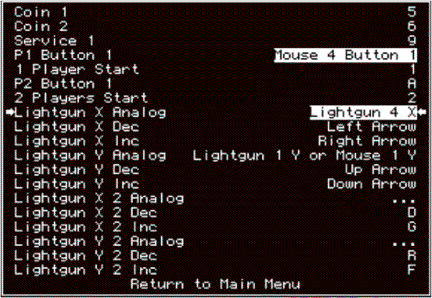
Select "Input (this
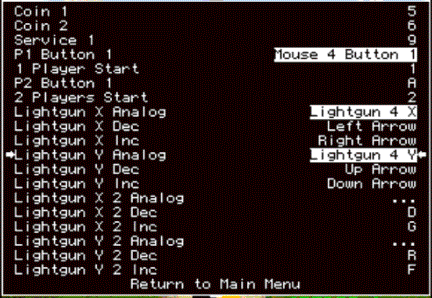
Game)". You will now see a menu similar to this:
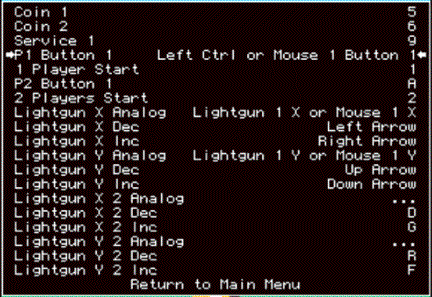
Move down so you can select
the fire trigger. This is "P1 Button 1". Press enter and it will be ready for
input like so:
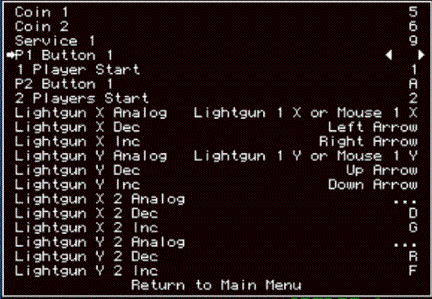
Point the Light
Gun at the screen and press the trigger
button on the gun you want to use for player 1. You should now see something
similar to this:
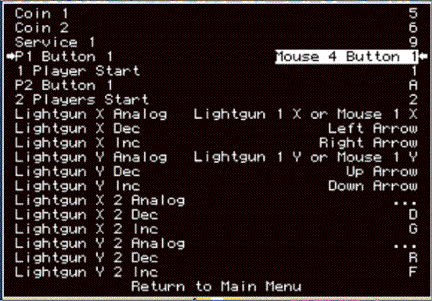
It shows "Mouse 4
Button 1" instead of "Lightgun 4 Button 1". This is
normal. A light gun is a mouse.
Only the X,Y data is different.
If you don’t get
a simple statement like “Mouse 4 Button 1” but instead get a complex formula
similar to "Mouse 2 B1 Gun 1 Y - Gun 2 X - Gun 2 Y - Gun 2 B0" like
this:
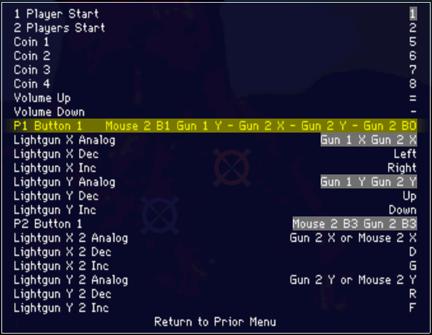
…then you must stop configuring for the moment, exit MAME, and follow the instructions listed in the
Addendum. You need to configure your “core input
automatic enable options” correctly.
If you didn’t
point your lightgun at the screen when you pressed the trigger, it is still
possible to get a simple statement like “Mouse 4 Button 1”. However, if your system requires
correcting your core configuration settings, not pointing your gun at the
screen for this step will not fix your configuration problems. Therefore, it’s important that your gun
was pointing at the screen when you pressed the trigger to see if you need to
follow the steps listed in the Addendum.
Otherwise
continue…
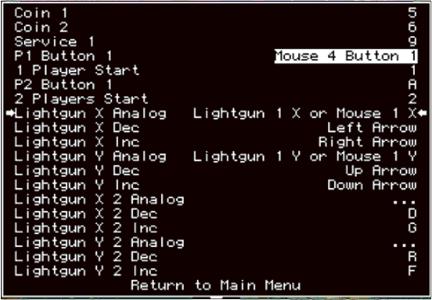
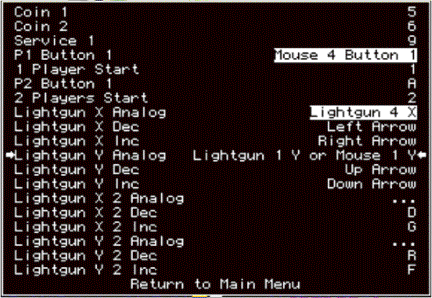
Now we need to move on to
selecting the light gun axes. Move down to highlight the "Lightgun X
Analog".
Do not press enter yet.
Do not
press enter yet. This is a
common mistake. Double check to
ensure you HAVE NOT pressed enter yet.
Before we can proceed we
need to position the light gun on the left side of the screen.
Point at the position shown
here and fire.
Now press enter to allow
selection of the light gun's X axis.
We will now move to the
right side of the screen and fire at the position shown here.
Try and keep the vertical
position close to the same line.
You now should have the
X-axis selected as shown here:
We will repeat the
procedure for the Y-axis. Move down to highlight "Lightgun Y
Analog".
Do not
press enter yet. This is a
common mistake. Double check to
ensure you HAVE NOT pressed enter yet.
Before we can proceed we
need to position the light gun on the top half of the screen.
Point at the position shown
here and fire.
Now press enter to allow
selection of the light gun's Y axis.
We will now move to the
bottom half of the screen and fire at the position shown here.
Try and keep the horizontal
position close to the same line. You now should have the Y-axis selected.
Repeat the whole procedure
for the other players as needed.
You are now ready to play.
If you are interested in
knowing what mice or light guns are reported as which Mouse in MAME, try using
the verbose command. When you quit the game you will see a list showing
each device.
mame yourgame -mouse -multimouse -verbose
ADDENDUM:
As of MAME version
0.117u, many configuration setting were moved to the mame.ini file. You should check your mame.ini file for
options that require configuration in there. This is especially true if you launch your games through a
front end, and/or don’t use command lines to configure MAME with each launch
(which seems tedious and complicated anyway). I highly recommend that you make a back-up of your mame.ini
before altering it, in case you break it.
It looks like this:

Generally, if
you break it, you can delete it and the next time you launch MAME it will
create a new default one. If, for
some reason, you don’t have one, try starting MAME with this command line to
create one:
mame -cc
You can also
create a separate configuration file for specific games (such as your lightgun
games) if you so choose. To do
this, make a copy of the mame.ini file, rename the copy to gamename.ini, and place that file in your “ini”
directory, typically located in the main MAME directory along with
MAME.exe. Of course, substitute gamename with the rom title of the appropriate
game. For example…
copymame.ini ----rename to---> luckywld.ini
By making a
separate configuration file for a specific game, you prevent changes you make
for that game from affecting all other games. MAME will first look for a specific .ini file in the ini
folder before resorting to the default mame.ini.
For simplicity,
this tutorial will work with the mame.ini itself.
Open mame.ini
using textpad or any other simple text editor. In the mame.ini file there are several things you need to
configure to make your lightgun work properly. To find them, simply do keyword searches for the things you
are looking for, or scroll the length of the document until you find them that
way.
In order to use lightguns, you must
configure your
CORE INPUT
OPTIONS, and CORE INPUT AUTOMATIC ENABLE OPTIONS, which by default looks like
this:
#
# CORE INPUT
OPTIONS
#
# ctrlr
<NULL> (not set)
mouse 0
joystick 0
lightgun 0
multikeyboard 0
multimouse 0
steadykey 0
offscreen_reload 0
joystick_map auto
joystick_deadzone 0.3
joystick_saturation 0.85
#
# CORE INPUT
AUTOMATIC ENABLE OPTIONS
#
paddle_device keyboard
adstick_device keyboard
pedal_device keyboard
dial_device keyboard
trackball_device keyboard
lightgun_device keyboard
positional_device keyboard
mouse_device mouse
To configure the
lightgun, make the following changes to your
CORE INPUT
OPTIONS:
mouse 1
lightgun 1
multimouse 1
offscreen_reload 1
Also, make the following
changes to your
CORE INPUT
AUTOMATIC ENABLE OPTIONS:
lightgun_device lightgun
After
configuring your mame.ini, it is advised that you go back to the directions
found in the tutorial above and finish your light gun set up.
If you've
followed all of the above, your lightgun should function correctly. You may still need to calibrate it,
using the directions already provided by ACT Labs. Be sure and check out the Pearls of Wisdom which follow to
maximize you lightgun’s potential.
Hope that helps
anyone.
Scott Miller
scottmiller@sc.rr.com
* * * * * * * * * * * *
PEARLS OF
WISDOM:
Some additional
pearls of wisdom to help you get the most out of your ACT Labs Light Gun:
To turn off the
crosshairs in lightgun games... press
"F1".
To calibrate
some of the lightgun games, (luckywld, area51 among others) you need to hold
down "9" and press "F2" to bring up the game's calibration
and test menu. You must calibrate
both Player1 and Player2, otherwise not even Player1 will function correctly.
“Terminator2-Judgement
Day”, while it looks like a light gun game, is actually an analogue joystick
game wherein the joystick looks like a gun. Players often get frustrated trying to calibrate their light
gun on this one, and of course it won't work. You need to calibrate an analogue joystick stick for this.
GollyGhost needs
updated background artwork, which is available here
http://aarongiles.com/mameart/.
Otherwise the ghosts are just floating around on a black background.
MateTesters
confirmed as of MAME version 0.77, “offscreen reload” was broken. It has since been addressed for most
titles. Some games allow button
two on the ACT Labs LightGun to be configured to the “offscreen reload”
function. You’ll know these games
because there will be an option to set this in the game’s input configuration
menu (to open this menu, press [tab] while in the game). Some other games, where ammunition
supplies were not an issue, compensated by reloading automatically with every
shot, or periodically. If your favorite
game doesn’t reload, keep your eye on MAME updates, I’m sure they are working
on it.
Hope that helps
anyone.
Scott Miller
scottmiller@sc.rr.com